Stomach Organ Drawing: The Ultimate Step-by-Step Guide!
Embarking on a stomach organ drawing journey requires understanding its intricate anatomy; the esophagus serves as the vital conduit delivering ingested material. Artists often find inspiration in medical illustrations like those found in Gray’s Anatomy, a foundational resource for anatomical accuracy. Mastering this skill allows you to better visualize and render realistic depictions, even potentially contributing to educational resources akin to those used by the Mayo Clinic. The challenge lies in capturing the stomach’s complex form, a skill practiced by many aspiring medical illustrators trained at institutions like the Guild of Natural Science Illustrators, and requires attention to the muscular layers that enable its function.
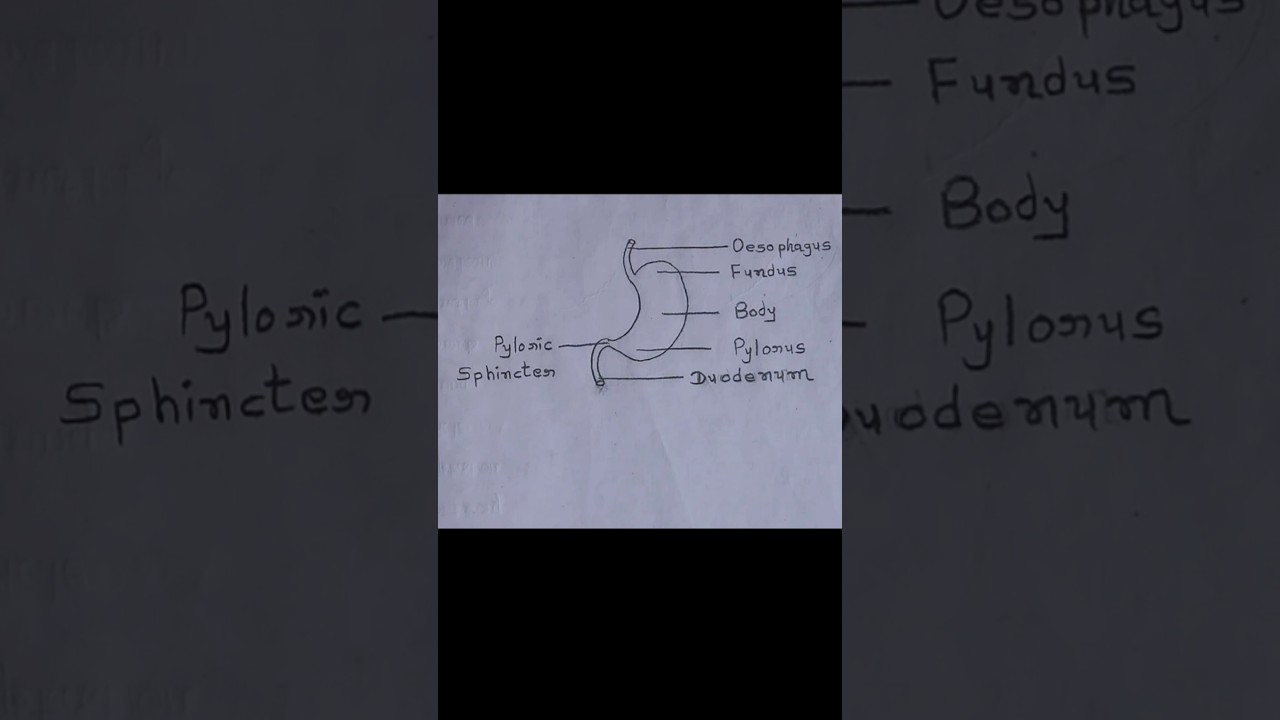
Image taken from the YouTube channel The Mommade , from the video titled Labelled Stomach Diagram #shorts .
Crafting the Perfect "Stomach Organ Drawing: The Ultimate Step-by-Step Guide!" Article Layout
This guide details how to structure a comprehensive article centered around teaching readers how to create a "stomach organ drawing". We will outline the key sections and elements needed to build an informative and instructional piece.
Understanding Your Audience and Goal
Before diving into the layout, it’s crucial to consider who you’re teaching and what you want them to achieve. Are they complete beginners, or do they have some existing artistic knowledge? The ultimate goal is to enable them to confidently create a representative drawing of the stomach organ.
Core Article Sections
Here’s a breakdown of the essential sections for your "Stomach Organ Drawing: The Ultimate Step-by-Step Guide!" article:
1. Introduction: Setting the Stage
- Purpose: This section should capture the reader’s attention and clearly state the article’s objective.
- Content:
- Briefly introduce the stomach and its function in the human body (one or two sentences max!).
- Highlight the value of understanding the stomach’s anatomy through drawing.
- Preview what the guide will cover – the different steps and techniques.
- Mention necessary materials (paper, pencil, eraser, etc.).
- Example Snippet: "The stomach plays a vital role in digesting the food we eat. In this guide, we’ll break down the process of drawing the stomach organ into manageable steps, helping you visualize its anatomy and learn through art. Get your pencils ready!"
2. Gathering Reference Material
- Purpose: Emphasize the importance of accuracy and provide resources.
- Content:
- Explain that drawing from reference improves accuracy and understanding.
- Include links to or embedded images of accurate anatomical diagrams of the stomach. Consider including both simplified and more detailed versions.
- Explain the different views available (anterior, posterior, etc.) and which view your guide will focus on.
- Consider: Including a small note about artistic license; a perfectly accurate depiction isn’t always necessary for a learning exercise.
3. Materials Needed
- Purpose: This section provides a quick checklist for the reader.
- Content:
- Create a bulleted list of essential drawing supplies:
- Pencils (different grades recommended, e.g., HB, 2B, 4B)
- Eraser (kneaded eraser recommended)
- Drawing paper
- Ruler (optional, for initial guidelines)
- Reference image (already provided in section 2)
- Create a bulleted list of essential drawing supplies:
4. Step-by-Step Drawing Instructions
This is the core of your article. This section requires careful planning and execution.
4.1. Step 1: Basic Outline and Proportions
- Purpose: Establish the overall shape and size of the stomach.
- Content:
- Start with light, easily erasable lines.
- Describe how to draw a simplified oval or bean-like shape representing the stomach’s general form.
- Use visual aids (images or GIFs) to illustrate the process clearly. An image after each step is crucial.
- Explain key proportions: the relative width to height of the stomach.
- Optionally, show how to use a ruler to draw guidelines to maintain proportions.
- Example: "Begin by sketching a light oval shape. This will be the basis of your stomach. Refer to the reference image to gauge the correct width and height. Don’t press too hard with your pencil – we’ll refine this shape later." (Include an image showing just the light oval).
4.2. Step 2: Adding Key Features – Cardiac and Pyloric Regions
- Purpose: Introduce the key anatomical regions of the stomach.
- Content:
- Explain where the cardiac (esophageal opening) and pyloric (duodenal opening) regions are located.
- Describe how to subtly alter the initial oval shape to reflect these regions.
- Provide visual aids demonstrating the changes.
- Example: "Now, let’s define the cardiac region, where the esophagus connects. Slightly indent the upper part of the oval… Then shape the pyloric region at the bottom." (Include an image with the oval now slightly shaped and labeled).
4.3. Step 3: Detailing the Curvatures – Greater and Lesser Curvature
- Purpose: Further refine the stomach’s shape with its distinctive curves.
- Content:
- Explain the greater and lesser curvatures and their roles.
- Illustrate how to smooth the lines and create the characteristic curves.
- Use visual aids with clear annotations.
- Example: "The greater curvature is the longer, convex curve on the left side of the stomach… Gently round the initial outline to create this smooth curve." (Image with the greater curvature clearly defined).
4.4. Step 4: Indicating Rugae (Internal Folds)
- Purpose: Add realistic texture to the internal lining.
- Content:
- Explain that rugae are the folds inside the stomach, allowing it to expand.
- Demonstrate how to draw light, irregular lines within the stomach outline to represent these folds.
- Emphasize that these lines shouldn’t be perfectly uniform.
- Example: "Inside the stomach, you’ll find rugae, which are folds that help with expansion. Using light, slightly curved lines, indicate these folds." (Image showing the faint rugae lines).
4.5. Step 5: Refining and Shading
- Purpose: Add depth and realism to the drawing.
- Content:
- Guide the reader through adding subtle shading to create a three-dimensional effect.
- Explain the light source and how it affects the highlights and shadows.
- Show how to use different pencil grades to create varying levels of shading.
- Encourage the reader to refine the outline and erase any unnecessary guidelines.
- Example: "Now, let’s add some shading to give your drawing depth. Imagine a light source coming from the top right. Use a darker pencil (e.g., 2B or 4B) to add shadows to the bottom and left sides of the stomach. Use a lighter pencil (e.g., HB) for highlights." (Image with shading applied).
5. Labeling the Parts (Optional but Recommended)
- Purpose: Reinforce anatomical knowledge.
- Content:
- Provide a diagram of the finished drawing with labels pointing to key anatomical features:
- Esophagus
- Cardiac region
- Fundus
- Body
- Pyloric region
- Greater curvature
- Lesser curvature
- Rugae
- Pyloric sphincter
- Duodenum (optional)
- Provide a diagram of the finished drawing with labels pointing to key anatomical features:
6. Troubleshooting and Common Mistakes
- Purpose: Help readers overcome challenges.
- Content:
- Address potential difficulties learners might face:
- "Struggling with the initial oval shape?" (Offer alternative approaches)
- "Lines are too dark?" (Remind them to use light strokes initially)
- "Difficulties with shading?" (Provide tips on blending and using different pencil grades)
- Show examples of common mistakes (e.g., disproportioned shapes, overly harsh shading) and explain how to correct them.
- Address potential difficulties learners might face:
Visual Aids: Essential Component
- Each step should be accompanied by a clear image or GIF that visually demonstrates the instruction.
- Annotations on the images should highlight key areas and actions.
Tone and Style
- Maintain a friendly, encouraging, and supportive tone.
- Use clear, concise language. Avoid complex jargon.
- Break down complex tasks into manageable steps.
- Emphasize the iterative nature of drawing – it’s okay to make mistakes and refine as you go.
FAQs: Mastering Your Stomach Organ Drawing
Here are some frequently asked questions to help you perfect your stomach organ drawing and understand the process better.
What’s the best way to start a stomach organ drawing for beginners?
Start with basic shapes. Sketch a rough oval for the overall form of the stomach and then add simplified shapes representing the cardia, fundus, body, and pylorus. Focus on proportions and placement first, then refine the details. A good foundation makes a more accurate stomach organ drawing.
How can I make my stomach organ drawing look more realistic?
Pay attention to anatomical references. Study real stomach diagrams to understand the organ’s structure, including the rugae (folds) inside the stomach. Use shading to create depth and highlight the contours, making the drawing look three-dimensional and more realistic as a stomach organ drawing.
What materials are recommended for a detailed stomach organ drawing?
A variety of tools can be used. A simple pencil and paper are a great start. For more detailed work, consider using fine-liner pens for outlining and blending stumps for smooth shading. Higher-quality drawing paper will also enhance the final appearance of your stomach organ drawing.
How do I show the stomach’s connection to other organs in my drawing?
Focus on the esophagus above and the duodenum below. Indicate where the esophagus enters at the cardia and the pylorus connects to the duodenum. Even simplified representations of these connections will provide context and enhance the accuracy of your stomach organ drawing.
So, there you have it – your ultimate guide to stomach organ drawing! Now go grab your pencils and paper and start creating! We hope this helps you create stunning illustrations. Don’t forget to share your artwork and let us know how your stomach organ drawing journey goes!
