Shade Like a Pro: Tree Techniques Step by Step [Viral]
Understanding the fundamentals of light and shadow is crucial for any artist aiming to master realism. Proko, known for his anatomical studies and drawing tutorials, emphasizes the importance of form and volume as a foundation for effective shading. Applying principles of atmospheric perspective, as seen in the landscapes of Albert Bierstadt, can significantly enhance depth in your artwork. With the use of rendering software like Photoshop, artists are enabled with the ability to execute complex methods. Mastering shading tree techniques step by step will dramatically elevate the realism and depth of your artistic creations.
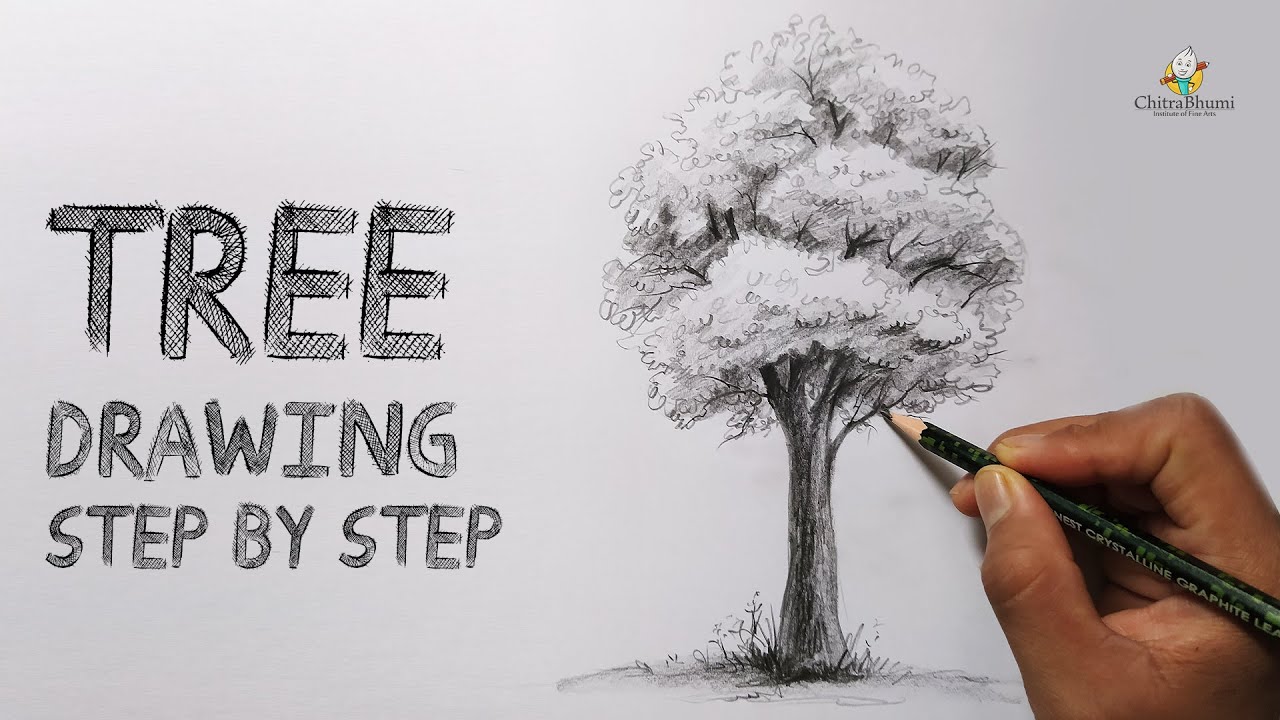
Image taken from the YouTube channel ChitraArt Academy , from the video titled How To Draw a Tree | Easy Step By Step | Pencil Drawing Shading | Tree with Leaves .
Shading Tree Techniques Step by Step: A Guide to Artistic Mastery
This article aims to guide you through various shading techniques to elevate your tree drawings from simple sketches to visually captivating works of art. We’ll break down the process into manageable steps, empowering you to shade trees like a professional artist!
Understanding Light and Shadow
Before diving into the specific techniques, let’s establish a foundation: understanding how light interacts with a tree. Light source is crucial; it dictates where highlights (lightest areas) and shadows (darkest areas) will fall. Imagine a spotlight shining on the tree – the side facing the light will be brighter, while the opposite side will be darker.
Identifying the Light Source
- Observe: First, decide where your light source is positioned. Is it coming from above, the side, or even behind the tree?
- Visualize: Mentally map out the light’s path and how it will affect the tree’s form.
- Consistency: Maintain the same light source throughout your drawing for a realistic and cohesive look.
Core Shadow, Highlight, and Reflected Light
Three key elements define how light creates form:
- Core Shadow: The darkest area on the tree, located opposite the light source.
- Highlight: The brightest area on the tree, directly facing the light source.
- Reflected Light: A subtle, lighter area within the shadow, caused by light bouncing off surrounding surfaces.
Shading Techniques: Building Depth and Realism
Now, let’s explore some shading techniques you can use to bring your trees to life:
Hatching and Cross-Hatching
Hatching involves drawing parallel lines to create areas of shadow. The closer the lines, the darker the shade. Cross-hatching builds on this by layering lines that intersect, creating even denser shadows.
-
Hatching:
- Start with a light pencil.
- Draw parallel lines in the direction of the form. For example, on a rounded branch, curve your lines slightly.
- Add more lines to darken areas.
-
Cross-Hatching:
- Apply hatching as described above.
- Layer another set of parallel lines, intersecting the first set at an angle.
- Adjust line density and angles to control the darkness.
Stippling
Stippling uses dots to create tone. The closer together the dots, the darker the area. This technique can add a unique texture to your tree.
- Stippling Steps:
- Start lightly, placing dots in areas that need shading.
- Gradually add more dots to increase the darkness.
- Vary the density of the dots to create smooth transitions.
Blending
Blending involves smoothing out pencil strokes to create soft transitions between light and shadow.
- Blending Methods:
- Using a Tortillon (Blending Stump): This tool helps blend pencil strokes smoothly.
- Using a Finger: A gentle touch can soften edges and create subtle gradients. Be mindful to avoid over-smudging.
- Layering: Applying multiple light layers of shading and gradually building up the tone.
Shading Foliage: Individual Leaves vs. Mass Shading
Foliage can be approached in two main ways: focusing on individual leaves or shading the entire mass as a single form.
-
Individual Leaves:
- Outline: Lightly sketch the shapes of individual leaves.
- Shading: Add shading to each leaf, considering the light source. Use hatching or stippling for texture.
- Overlap: Overlap leaves to create depth and realism.
-
Mass Shading:
- Outline: Define the overall shape of the foliage mass.
- Core Shadow: Indicate the core shadow area.
- Highlights: Lightly suggest highlights.
- Texture: Add texture using short, broken lines or stippling.
- Variation: Vary the tone within the mass to avoid a flat, uniform appearance.
Step-by-Step Example: Shading a Simple Tree
Let’s put these techniques together by shading a simple tree, showing the process sequentially:
- Basic Outline: Sketch the basic shape of the tree – the trunk, branches, and overall foliage outline.
- Light Source: Decide on your light source.
- Core Shadow: Lightly indicate the core shadow areas on the trunk and within the foliage.
- Hatching/Cross-Hatching (Trunk): Apply hatching or cross-hatching to the trunk, focusing on the core shadow.
- Stippling/Mass Shading (Foliage): Use stippling or mass shading to create texture and depth in the foliage.
- Highlights: Add subtle highlights using an eraser or by leaving areas unshaded.
- Reflected Light: Suggest reflected light within the shadow areas to add realism.
- Refinement: Review your drawing and make any necessary adjustments to the shading. Darken shadows, refine highlights, and add more texture where needed.
Choosing the Right Tools
The tools you use can significantly impact the final result. Here’s a quick overview:
| Tool | Description | Best Used For |
|---|---|---|
| Graphite Pencils | Varying grades (HB, 2B, 4B, etc.) affect darkness. Softer grades create darker shades. | Creating a range of values, from light highlights to deep shadows. |
| Erasers | Kneaded erasers are great for lifting graphite without damaging the paper. | Creating highlights, correcting mistakes, and softening edges. |
| Blending Stump | Blends graphite smoothly, creating soft gradients. | Achieving smooth transitions and subtle shading effects. |
| Paper | Smooth paper is good for blending, while textured paper is better for hatching/stippling. | Different textures produce different shading effects. |
Practice Makes Perfect
The key to mastering these shading tree techniques step by step is consistent practice. Don’t be discouraged if your early attempts aren’t perfect. Keep experimenting with different techniques, observing real trees, and refining your skills. The more you practice, the more confident and proficient you’ll become!
FAQs: Shade Like a Pro – Tree Techniques
This FAQ answers common questions about mastering shading tree techniques step by step. We’ll clarify key concepts and provide extra details to help you achieve professional-looking results.
What kind of pencil is best for shading trees?
A range of graphite pencils, from 2H to 6B, allows you to create a full range of values. Softer pencils (4B-6B) are ideal for darker shadows, while harder pencils (2H-HB) are great for lighter areas and details in your shading tree techniques step by step. Experiment to find your favorites.
How do I create a sense of depth when shading trees?
Use layering and varying the pressure of your pencil. Darker values in the foreground and lighter values in the background create the illusion of distance. Pay attention to light direction when using shading tree techniques step by step.
What if I’m struggling to create realistic leaf textures?
Don’t try to draw every single leaf. Instead, focus on suggesting texture through stippling, scumbling, or short, broken lines. Remember that varying the density and direction of these marks will enhance the realism in your shading tree techniques step by step.
How do I fix mistakes when shading a tree?
A kneaded eraser is your best friend. It can be molded to erase small details or lightly lift graphite without damaging the paper. For larger areas, a plastic or vinyl eraser can be used, but be gentle to avoid smudging. Remember that practice and correction are part of mastering shading tree techniques step by step.
Alright, now go forth and create some amazing shaded trees! Remember, practice is key to perfecting these shading tree techniques step by step. Happy shading!
