Power Automate: Delete Files by Identifier? Here’s How!
Microsoft’s Power Automate offers robust capabilities for workflow automation. SharePoint, a common data repository, often requires meticulous file management. The process of removing items from Dataverse relies on having the correct identification for each file. Understanding how to use power automate delete file file identifier ensures you can efficiently manage files and avoid unwanted storage consumption in your automated processes.
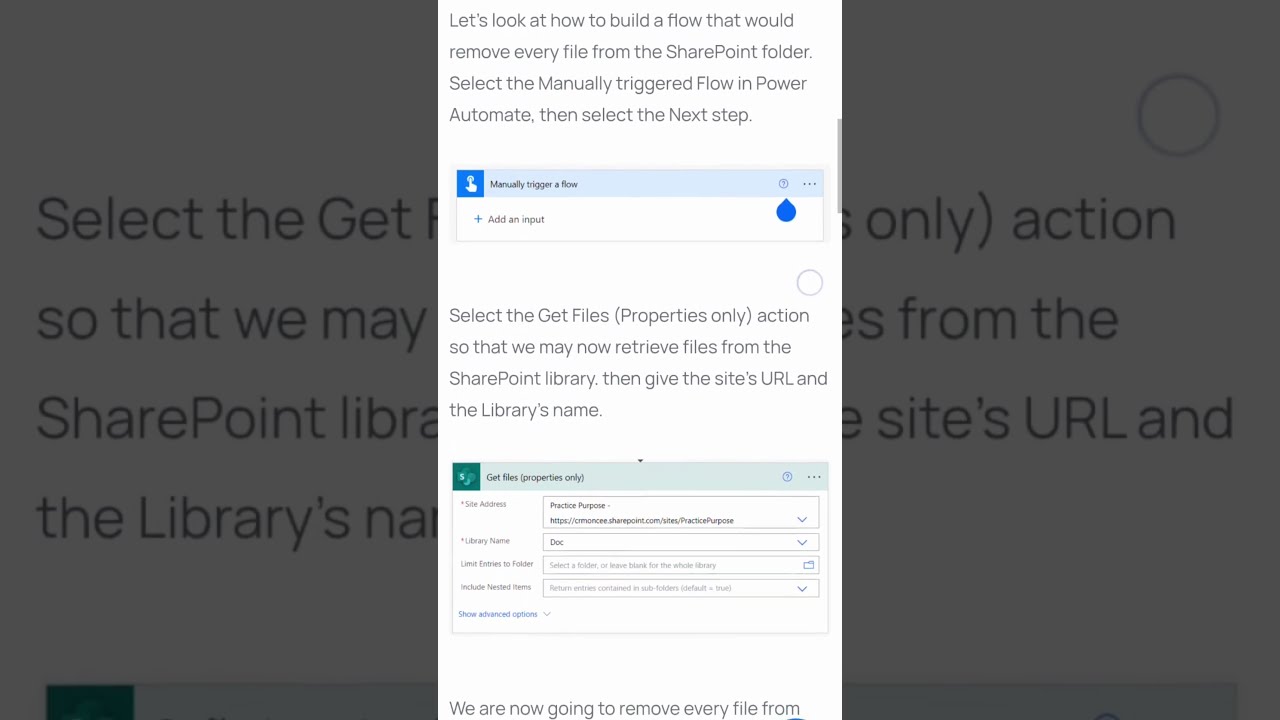
Image taken from the YouTube channel CRMONCE – Copilot AI | Power Apps | Power BI , from the video titled How To Delete File From SharePoint Using Power Automate. .
Power Automate: Delete Files by Identifier? Here’s How!
This guide explains how to use Microsoft Power Automate to delete files using their unique identifiers. Deleting files by identifier is crucial when you need to remove specific files without relying on file names or paths, which can be prone to errors or changes.
Understanding File Identifiers
Before diving into the Power Automate flow, it’s essential to understand what a file identifier is and where to find it.
What is a File Identifier?
A file identifier (often referred to as a File ID or Unique ID) is a unique alphanumeric string assigned to a file within a specific system, such as SharePoint, OneDrive, or other cloud storage services. This ID remains constant even if the file name or location changes, making it a reliable way to target and manage files.
Where to Find the File Identifier
The method to retrieve the file identifier varies depending on the platform. Here are a few common examples:
- SharePoint/OneDrive:
- Within a Power Automate flow, using actions like "Get file metadata" or "Get file properties." These actions will return a JSON object containing various properties, including the ‘Id’ field, which represents the file identifier.
- Directly from the SharePoint/OneDrive UI, in certain cases. While not always readily visible, accessing the file details or using browser developer tools might reveal the identifier.
- Other Platforms (e.g., Dropbox, Google Drive):
- Each platform will have its specific API and methods for retrieving file metadata, which includes the file identifier. Refer to the platform’s API documentation for the correct methods.
Building the Power Automate Flow
Now, let’s create a Power Automate flow to delete files using their identifiers. The general steps will be similar for most platforms, but the specific actions might differ. We will demonstrate using SharePoint as the example platform.
Step 1: Trigger the Flow
Choose a trigger that suits your scenario. This could be:
- Scheduled: Run the flow periodically to clean up old files.
- Manual: Trigger the flow manually when needed.
- Automated: Trigger the flow based on an event, such as a new file being created or modified.
For this example, let’s assume a "Manual trigger" for simplicity.
Step 2: Initialize a Variable (Optional, but Recommended)
Initializing a variable to store the file identifier allows for greater flexibility and maintainability, especially if you need to use the identifier multiple times within the flow.
- Action: "Initialize variable"
- Name:
FileID(or any descriptive name) - Type: String
- Value: (Leave blank initially, or set a default value for testing)
Step 3: Get the File Identifier (If Not Already Available)
If the file identifier is not already known and accessible from the trigger, you need to retrieve it.
- Action: "Get file properties" (For SharePoint – use appropriate action for other platforms)
- Site Address: Select the SharePoint site.
- List or Library: Select the document library.
- Id: You might need to use a dynamic content expression to point to the file from a previous action. If you already know the identifier, you can manually enter or map the identifier into the ID field of this step. If the flow is intended to get the file identifier and then delete the file right after, it can be useful to pass the name of the file to get the file properties from.
Step 4: Delete the File
This is the core step where the file is actually deleted.
- Action: "Delete file" (For SharePoint – use appropriate action for other platforms)
- Site Address: Select the SharePoint site.
-
File Identifier: Here, you will use the file identifier. This can come directly from the "Get file properties" action (if used in Step 3) by using dynamic content. If you initialized a variable in Step 2, you can use the variable here to provide the file identifier value.
- Important: Make sure the File Identifier parameter of this action requires an ID, and not a file path.
Step 5: Error Handling (Highly Recommended)
Implement error handling to gracefully manage situations where the file cannot be found or deleted.
- Use the "Configure run after" option on the "Delete file" action. Configure it to run if the previous action ("Delete file") fails.
- Add an action like "Send an email" or "Post a message to Teams" to notify the administrator about the error.
- You can use actions like "Terminate" flow to prevent further processing if a critical error occurs.
Example Flow Configuration (SharePoint)
The following table illustrates a simplified example of the flow configuration when deleting a file on SharePoint.
| Action | Configuration |
|---|---|
| Manual trigger | (No configuration needed) |
| Initialize variable | Name: FileID, Type: String |
| Get file properties | Site Address: [Your SharePoint Site], List or Library: [Your Document Library], Id: [Dynamic Content - ID] |
| Delete file | Site Address: [Your SharePoint Site], File Identifier: [Variables - FileID] |
| (On Failure) Send email | To: [Admin Email], Subject: File Deletion Failed, Body: Error deleting file with ID: [Variables - FileID] |
Best Practices
- Test Thoroughly: Always test your flow in a development environment before deploying it to production.
- Use Variables: Using variables makes your flow more readable and easier to maintain.
- Implement Error Handling: Error handling is crucial to prevent unexpected flow failures.
- Secure Your Flow: Ensure that the flow has the necessary permissions to access and delete files.
- Log Activities: Consider logging file deletion activities for auditing purposes.
Power Automate Delete File by Identifier: FAQs
Here are some frequently asked questions regarding deleting files by their unique identifier in Power Automate.
Why should I delete files using their identifier instead of their name?
Using a file identifier is more reliable. File names can be changed, causing your flow to fail. The unique file identifier remains constant, ensuring that the power automate delete file action correctly targets the intended file even if the name changes. This is especially useful when dealing with dynamic filenames.
Where do I find the file identifier in SharePoint?
The file identifier is typically found within the metadata of the file within your SharePoint library or other supported connector. When you retrieve a file’s properties using a "Get file metadata" action (or similar), the file identifier will be one of the returned properties. Make sure to understand which connector you are using to power automate delete file action.
Can I use the "Delete file" action to delete multiple files at once using identifiers?
No, the standard "Delete file" action in Power Automate only allows you to delete one file at a time. If you need to delete multiple files, you’ll need to iterate through a collection of file identifiers using a "Apply to each" loop, passing each file identifier to the power automate delete file action within the loop.
What happens if the file identifier I provide to the "Delete file" action is incorrect?
If the file identifier is incorrect or the file doesn’t exist, the "Delete file" action will usually return an error. It’s important to implement error handling in your flow (using "Configure run after") to catch these scenarios and take appropriate action, such as logging the error or sending a notification. Always validate your power automate delete file flow.
Alright, that wraps it up! Hopefully, you now have a clearer picture of how to use power automate delete file file identifier. Go give it a try and happy automating!
