Draw a Thermometer Like a Pro! Easy Steps & Labeling Secrets
In the dynamic realm of science education, a clear, accurate diagram can bridge the gap between complex concepts and student understanding. Yet, mastering the art of drawing precise scientific illustrations, especially something as fundamental as a thermometer, often feels like a secret known only to a few.
Are you a student striving for perfection in your assignments, or an educator aiming to furnish your lessons with impeccably clear visuals? Look no further! This comprehensive guide is designed to unlock the ‘secrets’ to drawing and labeling a professional-grade thermometer diagram, making it an invaluable asset for your educational purposes.
From the foundational structure to understanding diverse temperature scales like Celsius and Fahrenheit, and perfecting those crucial labeling details, we’ll walk you through every step-by-step instruction. Get ready to transform your scientific drawings into powerful teaching and learning tools!
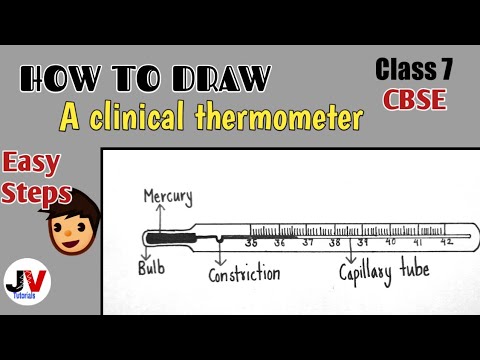
Image taken from the YouTube channel JV tutorials , from the video titled how to draw thermometer|how to draw clinical thermometer|class 7 thermometer diagram .
In the fascinating realm of science education, the ability to communicate complex ideas clearly is paramount, and often, the most effective explanations are visual.
The Visual Language of Temperature: An Essential Guide to Drawing Professional Thermometers
Accurate diagrams are more than just illustrations; they are powerful educational tools that bridge the gap between abstract concepts and concrete understanding. For both students grappling with new scientific principles and educators striving to convey information effectively, a well-drawn diagram can significantly enhance the learning experience. This section delves into why mastering the art of drawing a thermometer for educational purposes is so crucial and outlines how this comprehensive guide will equip you with the necessary skills.
The Indispensable Role of Accurate Diagrams in Science Education
Visual aids are fundamental to how we learn, especially in subjects like science where abstract ideas often need to be visualized to be fully grasped. For a thermometer, a seemingly simple device, an accurate diagram serves multiple critical functions:
- For Students:
- Conceptual Understanding: A clear diagram helps students visualize how a thermometer works, from the expansion and contraction of the liquid to the calibration of scales.
- Memory Retention: Visual information is often easier to recall than text alone, making it simpler for students to remember the parts of a thermometer and how to read it.
- Application Skills: Learning to draw a thermometer correctly reinforces their understanding of its components and function, preparing them to interpret real-world temperature readings and scientific data.
- Problem-Solving: When solving problems related to temperature or heat transfer, a mental image (or a quick sketch) of an accurately represented thermometer can guide their thought process.
- For Educators:
- Clarity in Instruction: Accurate diagrams allow educators to explain complex concepts, such as temperature scales or thermal expansion, with greater precision and clarity.
- Engaging Content: Visually appealing and correct diagrams capture students’ attention and make lessons more engaging and memorable.
- Assessment Tools: Educators can use students’ thermometer drawings as a form of assessment to gauge their understanding of its structure and function.
- Consistency: Providing or teaching how to create standardized, professional diagrams ensures consistency in teaching materials and student understanding across different topics and grades.
In essence, a precisely drawn thermometer diagram is not just a picture; it’s a foundation for scientific literacy, fostering deeper comprehension and critical thinking.
Introducing Your Comprehensive Guide to Professional Thermometer Drawing
Recognizing the vital role of these visual aids, we’ve developed a comprehensive guide dedicated to mastering the art of drawing and labeling a thermometer professionally. Whether you’re a student looking to ace your science reports or an educator aiming to enhance your teaching resources, this guide is designed to provide you with all the necessary tools and techniques.
This guide will systematically walk you through every aspect of creating a clear, informative, and accurate thermometer diagram. We’ll ensure that by the end, you’ll be able to confidently illustrate this essential scientific instrument.
What This Guide Will Cover: Your Roadmap to Mastery
To ensure you gain a holistic understanding and practical skills, this guide will meticulously cover the following key areas:
- Step-by-Step Instructions: We’ll break down the drawing process into simple, manageable steps, guiding you from the initial outline to the final details. You’ll learn the correct proportions and features that define an accurate thermometer.
- Understanding Temperature Scales: A thermometer is only as useful as its scale. We will thoroughly explain both the Celsius and Fahrenheit temperature scales, including their typical ranges, how they are marked, and the significance of key reference points like freezing and boiling points. This understanding is crucial for accurate labeling.
- Essential Labeling Tips: A well-drawn diagram can lose its impact without proper labeling. We’ll provide best practices for clearly and concisely labeling all components of the thermometer, ensuring your diagram is easily understood by anyone who views it. This includes pointers on line weights, text placement, and using appropriate terminology.
Setting the Stage: Unlocking the ‘Secrets’ to Informative Diagrams
Prepare to uncover the ‘secrets’ that professional illustrators and educators use to create diagrams that truly communicate. By demystifying the process and providing actionable insights, this guide aims to transform your ability to create clear and informative thermometer diagrams that stand out in any educational context.
Now that we understand the importance and scope of our mission, let’s begin by laying the groundwork for our visual creation.
Now that we’re ready to master the art of drawing thermometers for educational purposes, our journey begins with understanding their fundamental components.
Secret #1: Blueprinting Brilliance – Constructing Your Thermometer’s Foundational Form
Every accurate scientific illustration starts with a solid foundation. For a thermometer, this means carefully constructing its core anatomy: the glass tube, the bulb, and the capillary tube. By mastering these initial steps, you’ll create a clear and professional diagram that effectively conveys information.
The Main Body: Outlining the Glass Tube Structure
The glass tube is the most prominent part of your thermometer drawing, housing the essential measuring components. Beginning your drawing by outlining this main body correctly sets the stage for everything else.
- Start with Parallel Lines: Use a ruler to draw two perfectly parallel lines. These lines will define the sides of your thermometer’s main glass tube. Ensure they are straight and evenly spaced.
- Define Length: The length of these lines will determine the overall size of your thermometer. For educational diagrams, aim for a length that allows sufficient space for scales and clear depiction of other features.
- Close the Top: Gently curve the top ends of these parallel lines to meet, forming a sealed, rounded, or slightly flattened end. This represents the sealed top of the glass tube.
- Tip: Consider the intended scale when determining the width. A wider tube might imply a more robust industrial thermometer, while a narrower one is common for clinical or lab use. Consistency is key for a clear diagram.
The Distinct Bulb: Where Measurement Begins
The bulb is arguably the most critical part of a liquid-in-glass thermometer, as it’s where the temperature-sensitive liquid expands and contracts. Drawing it proportionately and distinctly is essential for educational accuracy.
Step-by-Step Bulb Drawing
- Locate the Bottom: At the very bottom of your drawn glass tube, mark a central point. This will be the center of your bulb.
- Draw the Curve: From the two bottom corners of your main glass tube, draw outward-curving lines that descend slightly, then meet to form a distinct, rounded shape.
- Complete the Shape: The bulb can be spherical, cylindrical, or slightly elongated, depending on the type of thermometer you’re depicting. For general educational purposes, a clearly defined, slightly rounded or spherical shape is ideal. Ensure it’s noticeably wider than the main glass tube.
- Proportion Check: The bulb should be large enough to hold a visible quantity of liquid but not so disproportionately large that it dominates the entire drawing. A good rule of thumb is for its widest point to be about 1.5 to 2 times the width of the main glass tube.
The Capillary Tube: The Narrow Pathway
Running through the center of the glass tube is the capillary tube, a very fine, hollow bore through which the liquid expands or contracts. Accurately depicting this narrow tube is crucial for showing the thermometer’s internal mechanism.
- From Bulb to Top: Starting from the top center of your bulb, draw a single, very thin line that extends straight up through the center of your main glass tube.
- Maintain Consistency: This line should be consistently thin and straight, representing the capillary tube’s uniform bore. It should not touch the outer edges of the glass tube outline.
- End Point: The capillary tube should typically extend close to the top of the main glass tube, or to a point just below the sealed end.
- Detailing: Remember that the capillary tube itself is a transparent glass tube. The liquid inside it is what will be colored later. For now, focus on its structural line work.
Achieving Symmetry and Clean Lines for Your Basic Structure
The foundation of any good diagram lies in its precision. Maintaining symmetry and clean lines will elevate your thermometer drawing from a mere sketch to an effective educational tool.
- Use a Ruler: This cannot be stressed enough. For the main body and the capillary tube, a ruler is indispensable for straight, parallel lines.
- Light Sketching: Begin with light pencil strokes. This allows you to easily erase and adjust lines if they aren’t symmetrical or perfectly straight.
- Mirror Image: As you draw the main glass tube and the bulb, visualize them as mirror images along a central vertical axis. This helps ensure both sides are balanced.
- Practice Curves: The curves for the bulb and the top of the tube should be smooth and even. Practice drawing these freehand or use a compass/template for perfect circles if preferred.
- Refine and Darken: Once you are satisfied with the basic structure, go over your light lines with slightly more pressure or a darker pencil/pen to create a clean, defined outline.
With your thermometer’s basic structure firmly established, you’re now perfectly poised to explore the fascinating world of temperature scales that bring it to life.
With the fundamental structure of your thermometer now sketched out, it’s time to decide how it will measure and communicate the concept of heat.
Secret #2: Choosing a Language for Heat – Celsius vs. Fahrenheit
Before you can add any markings to your thermometer, you need to understand the "language" it will speak. Temperature itself is a measure of how hot or cold something is, but a temperature scale is the standardized system we use to give that measurement a number. Different scales exist primarily for historical reasons; scientists in different parts of the world developed their own methods for measuring temperature, and a few of those systems became widely adopted.
For your drawing, the two most important scales to know are Celsius and Fahrenheit. Let’s break them down.
Understanding the Celsius Scale (°C)
The Celsius scale, developed by Swedish astronomer Anders Celsius, is celebrated for its simplicity and logic. It is a "centigrade" scale, meaning it is based on a 100-degree interval between two key reference points.
- Core Concept: The Celsius scale is based entirely on the properties of water at standard atmospheric pressure.
- Freezing Point of Water: This is the scale’s starting point, set at 0°C.
- Boiling Point of Water: This is the upper reference point, set at 100°C.
Because of this straightforward 0-to-100 range for water, the Celsius scale is the standard for scientific work and is used by the vast majority of countries around the world.
Understanding the Fahrenheit Scale (°F)
The Fahrenheit scale was created by physicist Daniel Gabriel Fahrenheit. Its reference points are less intuitive than Celsius because they were not originally based on the freezing and boiling points of water.
- Core Concept: The original scale was based on three points: a freezing brine solution (0°F), the freezing point of water (32°F), and an approximation of human body temperature (originally set near 96°F).
- Freezing Point of Water: On this scale, water freezes at 32°F.
- Boiling Point of Water: Water boils at 212°F.
This places a 180-degree interval between water’s freezing and boiling points. The Fahrenheit scale is still the primary scale used for everyday temperature measurement in the United States and a few other territories.
To help you visualize the key differences, here is a simple comparison:
| Reference Point | Celsius Scale | Fahrenheit Scale |
|---|---|---|
| Freezing Point of Water | 0°C | 32°F |
| Boiling Point of Water | 100°C | 212°F |
Deciding Which Scale to Draw
Now for the practical part: how do you apply this to your drawing? The choice of scale—or scales—will determine how you mark your thermometer.
- Consider Your Audience: Who is this drawing for? If it’s for a U.S.-based audience or represents an everyday scene in America, Fahrenheit is a logical choice. For a scientific illustration or an international audience, Celsius is the standard.
- Show Both for Clarity: The best option for a universally understood drawing is to include both scales. Many real-world thermometers do this, with Celsius on one side of the capillary tube and Fahrenheit on the other. This makes your illustration more detailed and informative.
- Prepare for the Next Step: Before moving on, make a firm decision. Will you draw Celsius, Fahrenheit, or both? Also, decide on the total temperature range you want your thermometer to display (e.g., from -20° to 120°). This decision is the essential blueprint you’ll need for the next stage.
With your chosen scale(s) in mind, you’re now ready to tackle the precise task of marking the individual degree lines.
Now that we understand the fundamental differences between the Celsius and Fahrenheit scales, let’s translate that knowledge into a practical skill by accurately marking them on our thermometer diagram.
The Ruler of Heat: A Guide to Scribing Perfect Temperature Markings
A thermometer diagram without markings is just a drawing of a tube; the graduations are what give it meaning and transform it into a functional scientific instrument. Creating clear, accurate, and evenly spaced markings is an art that ensures anyone, especially students, can read the temperature at a glance.
A Step-by-Step Guide to Adding Graduations
Follow this structured approach to mark your capillary tube with precision, turning a blank slate into a tool for measurement.
-
Establish Your Anchor Points: The foundation of any accurate scale is its fixed points. For a standard thermometer, these are the freezing and boiling points of water.
- Mark the level of the liquid at water’s freezing point. This will be 0° on the Celsius scale or 32° on the Fahrenheit scale.
- Mark the level of the liquid at water’s boiling point. This will be 100° on the Celsius scale or 212° on the Fahrenheit scale.
-
Divide the Space Evenly: The space between your two anchor points must be divided into equal increments. This is the most critical step for accuracy.
- For Celsius: You need to divide the space into 100 equal parts.
- For Fahrenheit: You need to divide the space into 180 equal parts (212 – 32 = 180).
- Using a ruler, measure the total distance between your two anchor points and divide that measurement by the required number of increments (100 or 180) to find the precise spacing for each degree.
-
Draw the Tick Marks: Once you know the spacing, you can begin drawing the tick marks along the side of the capillary tube. We’ll refine this in the next section.
The Hierarchy of Tick Marks: Major vs. Minor
To make the scale easy to read, not all tick marks should look the same. A clear visual hierarchy helps the eye quickly identify temperature values. Think of it like a ruler, where centimeters are marked differently from millimeters.
- Major Tick Marks: These are the longest lines and indicate the most significant increments, typically every 10 degrees (e.g., 10°, 20°, 30°). They are usually the only marks that get a numerical label.
- Intermediate Tick Marks: These are medium-length lines that break up the larger sections, often marking the halfway point (e.g., 5°, 15°, 25°). They provide a quick visual guide between the major marks.
- Minor Tick Marks: These are the shortest lines and represent the smallest increment, usually every 1 or 2 degrees. They fill in the details and allow for precise readings.
Example for a Celsius Scale
- Long Line: At 0°C, 10°C, 20°C, etc.
- Medium Line: At 5°C, 15°C, 25°C, etc.
- Short Line: At 1, 2, 3, 4, 6, 7, 8, and 9 degrees.
Labeling for Clarity: Adding the Numbers
Clear numbering is just as important as the tick marks themselves. If the labels are messy or confusing, the entire diagram loses its educational value.
- Placement and Orientation: Place the numerical values to one side of the capillary tube (the left side is most common). Ensure they are written horizontally for easy reading and do not overlap with the tick marks.
- Frequency of Labeling: You do not need to label every tick mark. Only add numbers next to the major tick marks (e.g., every 10 degrees). This prevents visual clutter and makes the scale much cleaner.
- Don’t Forget the Unit!: Clearly indicate which scale you are using. Add the unit symbol (e.g., °C or °F) at the top of the temperature column to define the entire scale.
Ensuring Your Graduations are Fit for Education
For a diagram intended for students, legibility and accuracy are paramount. The goal is to create a learning tool that is unambiguous and easy to understand.
- Use a Ruler: Precision is key. Use a ruler to draw all tick marks, ensuring they are straight and perfectly spaced.
- Write Neatly: Use a clean, simple font for the numbers. Avoid overly stylized or cursive writing that could be difficult to read.
- Ensure High Contrast: Make sure your markings and numbers stand out clearly against the background. Black lines and numbers are standard for a reason.
- Double-Check Your Work: Before finalizing your diagram, count your increments to ensure you have the correct number between your anchor points (100 for Celsius, 180 for Fahrenheit).
While these principles perfect the classic liquid-in-glass thermometer diagram, they also provide a foundation for understanding the scales used in many other temperature-measuring devices.
Once you’ve mastered the precision of accurate graduations and markings, it’s time to delve deeper into the diverse internal mechanisms that these scales measure.
The Liquid Heart: Exploring Your Thermometer’s Diverse Personalities
Not all thermometers are created equal, especially when it comes to what’s inside them. While their outward appearance might seem similar at first glance, the type of liquid used profoundly impacts their function, visual characteristics, and the way you should represent them in your drawings. Understanding these common variations, particularly the mercury and alcohol thermometers, is crucial for accurate and informed visual representation.
A Glimpse into the Thermometer Family
The two most prevalent types of liquid-in-glass thermometers you’ll encounter are those utilizing mercury and those employing alcohol. Each has distinct properties that make them suitable for different applications, and these properties also lead to subtle but important visual cues that you, as an artist, need to observe and replicate.
The Classic: Mercury Thermometers
For decades, mercury thermometers were the gold standard due to mercury’s stable and predictable expansion properties over a wide range of temperatures.
Visual Characteristics and Properties:
- The Liquid: The most defining characteristic is the mercury itself – a unique, silvery, and highly reflective liquid metal. When viewed in the capillary tube, it presents a distinct metallic sheen rather than a flat color.
- The Bulb: Mercury thermometers often feature a more compact, cylindrical, or slightly elongated bulb. This design is efficient for containing the dense mercury and allowing for precise thermal expansion.
- Typical Uses: Historically, mercury thermometers were widely used in medical settings (fever thermometers), laboratories, and industrial applications where high precision and a broad temperature range (above freezing) were required.
Drawing the Mercury Column:
Representing mercury accurately goes beyond simply drawing a grey line. To capture its metallic sheen:
- Use a base grey tone.
- Add a very subtle highlight (a thin line of white or very light grey) along one edge of the column to suggest reflectivity, as if catching the light.
- Ensure the column appears dense and opaque.
The Colorful Alternative: Alcohol Thermometers
Alcohol thermometers offer a safer and often more cost-effective alternative to mercury, especially for measuring lower temperatures.
Visual Characteristics and Properties:
- The Liquid: The liquid in these thermometers is typically alcohol (such as ethanol or toluene), which is clear. To make it visible against the glass and scale, a vibrant dye is added. Common colors include red, blue, or green. Unlike mercury, this color is uniform and lacks a metallic sheen.
- The Bulb: Alcohol thermometers frequently feature a larger, sometimes rounder, bulb compared to mercury thermometers. This is because alcohol expands more than mercury for the same temperature change and needs a greater volume to show significant movement, especially in colder conditions.
- Typical Uses: Alcohol thermometers are commonly found in households (outdoor thermometers), school laboratories, and environments where very low temperatures need to be measured, as alcohol has a much lower freezing point than mercury.
Drawing the Alcohol Column:
Representing the alcohol column is generally more straightforward:
- Use a consistent, vibrant color (red, blue, or green) throughout the column, as dictated by the specific thermometer you are depicting.
- Avoid any metallic highlights; the color should appear flat and uniform, perhaps with a slight translucency if the alcohol itself is not completely opaque.
Side-by-Side: A Visual Comparison
To further solidify your understanding of these differences, here’s a table summarizing the key visual and functional distinctions between mercury and alcohol thermometers:
| Feature | Mercury Thermometer | Alcohol Thermometer |
|---|---|---|
| Liquid Type | Mercury | Alcohol (e.g., ethanol, toluene, dyed for visibility) |
| Visual Appearance | Silvery, metallic, reflective column | Brightly colored (red, blue, green), uniform column |
| Bulb Design | Often more compact, cylindrical, or elongated | Can be larger and sometimes rounder |
| Typical Uses | Medical, laboratory, industrial (historically) | Household, weather, school labs, very cold environments |
| Drawing Tip | Represent with a subtle sheen to suggest reflectivity | Use a consistent, vibrant, flat color |
Capturing the Column: Representing the Liquid Accurately
The capillary tube, that narrow channel where the liquid rises and falls, is where the magic happens. When drawing, remember:
- Mercury: Focus on the silvery sheen. This means considering light sources and adding very subtle reflections or highlights to make it appear metallic and three-dimensional, not just a flat grey.
- Alcohol: Emphasize the colored appearance. The column should be a solid, even block of color without metallic reflections. A slight sense of translucency might be appropriate if the liquid is not heavily dyed.
Understanding these nuanced visual characteristics is vital, as the next step is to clearly and comprehensively label these distinctions within your diagrams.
After exploring the fascinating variety of thermometers available, it’s time to refine how we present their inner workings.
Your Diagram’s Voice: Mastering the Art of Labeling for Perfect Understanding
Creating a clear and effective diagram of a thermometer is only half the battle; the real magic lies in how you label it. A well-labeled diagram speaks volumes, transforming a mere drawing into a powerful teaching tool. It guides the eye, clarifies complex parts, and ensures that both students and educators can effortlessly grasp the instrument’s function and components.
Pinpointing the Vital Organs: What Needs a Label?
A well-labeled diagram begins with knowing exactly what to highlight. For a standard liquid-in-glass thermometer, there are several key components that demand attention to ensure clarity and full comprehension:
- The Bulb (Thermometer): This is the reservoir at the bottom, typically filled with a thermometric liquid like mercury or colored alcohol. It’s the part that comes into contact with the substance whose temperature is being measured, and where the liquid expands or contracts.
- The Capillary Tube: A very narrow, delicate glass tube extending upwards from the bulb. As the liquid in the bulb expands or contracts, it moves up or down this tube, allowing for precise measurement.
- Temperature Scales (Celsius and Fahrenheit): These are the numerical markings etched or printed alongside the capillary tube, indicating different temperature units. It’s crucial to label both the specific scale (e.g., "Celsius Scale," "Fahrenheit Scale") and representative temperature values (e.g., 0°C, 100°C, 32°F, 212°F).
- Current Temperature Reading: This refers to the specific point on the scale where the top of the liquid column rests at a given moment. Labeling an example reading (e.g., "Current Temperature: 25°C") brings your diagram to life and demonstrates how the thermometer is used.
Strategic Placement: Making Labels Stand Out, Not Clutter
Once you know what to label, the next step is how to place those labels. Effective placement is an art that prevents your diagram from becoming a tangled mess, ensuring legibility and aesthetic appeal. Consider these best practices:
- Clarity Over Clutter: Aim for ample white space around your labels. Do not overlap labels with each other, with the diagram itself, or with other textual elements. Giving each label breathing room makes the entire diagram easier to process.
- Legibility is Key: Use a clear, simple font that is easy to read at a glance. Sans-serif fonts like Arial or Calibri are often good choices. Ensure the font size is appropriate – large enough to be seen easily, but not so large that it dominates or overwhelms the diagram.
- Consistent Alignment: Whenever possible, align your labels neatly, either horizontally or vertically. This creates a clean, professional look and makes the information easier to scan. Consider placing all labels on one side of the diagram if possible, or evenly distributing them.
- Group Related Labels: If multiple small components are close together, consider grouping their labels or using a consistent labeling style (e.g., all labels on the right side) to maintain order and reduce visual chaos.
Precision Pointers: Guiding the Eye with Arrows and Lines
Arrows and lines are your visual guides, connecting a label to its specific component with pinpoint accuracy. Used effectively, they eliminate ambiguity and lead the viewer’s eye exactly where it needs to go. Here’s how to employ them masterfully:
- Direct and Clear: Lines should be straight and extend directly from the label to the component. Avoid wavy, curved, or unnecessarily long lines that can confuse the viewer or clutter the diagram.
- Minimal Intersections: Try to draw lines so they don’t cross over other lines or obscure other parts of the diagram. If lines must cross, ensure one is clearly dominant or consider slightly offsetting them to maintain clarity.
- Appropriate Line Weight: Lines should be thin enough not to distract from the diagram’s main subject, but thick enough to be easily visible. A fine, consistent line weight across all labels is ideal.
- Effective Arrowheads: Use clear, simple arrowheads at the point of connection to the component. The arrowhead should clearly point to the part, not just near it, leaving no doubt about the labeled item.
- Consistency: Maintain a consistent style for all your lines and arrows throughout the diagram. This includes line thickness, color, and arrowhead design, contributing to a polished and professional appearance.
Beyond the Basics: Crafting a Teaching Masterpiece
The ultimate goal of your labeled thermometer diagram is to serve as an invaluable resource, clarifying how this essential tool works. To ensure it truly educates, review your work with these points in mind:
- Accuracy First: Double-check that every component is correctly identified and labeled. An incorrect label can be more detrimental than no label at all, leading to misunderstandings.
- Completeness: Have you included all essential parts mentioned above? Missing a key element means the diagram isn’t fully comprehensive and may leave gaps in understanding.
- Clarity from a Fresh Perspective: Step away from your diagram for a short while, then return to it with fresh eyes. Is everything immediately understandable? Could a complete novice grasp the information without additional explanation?
- Purposeful Design: Remember that this diagram is a teaching tool. It should invite curiosity, answer questions, and reinforce understanding for both students trying to learn and educators explaining concepts.
- Seek Feedback: If possible, ask someone else (a peer, a teacher, or even a friend unfamiliar with thermometers) to review your diagram. They might spot areas that could be clearer or more accurately depicted, offering valuable insights.
With these labeling secrets in hand, you’re well on your way to creating a diagram that is not just accurate, but truly educational, leading us to a comprehensive look at the perfect thermometer diagram.
Having uncovered the secrets to impeccable labeling, we’re now ready to apply that precision to a fundamental scientific illustration.
From Outline to Insight: Crafting Your Perfect Thermometer Diagram
Throughout this guide, we’ve dissected the art and science of creating effective diagrams, culminating in our focused discussion on the indispensable thermometer. This section serves as your essential recap, consolidating the step-by-step instructions and ‘labeling secrets’ into a clear blueprint for both students striving for clarity and educators aiming to inspire.
A Journey in Steps: Recalling the Thermometer Diagram Process
Creating a truly effective thermometer diagram isn’t just about drawing lines; it’s about conveying a complete and accurate understanding of temperature measurement. Let’s revisit the core steps we’ve explored, integrating our labeling principles:
- Foundation First: The Basic Structure: Begin with the core components – the glass tube, the bulb, and the mercury/alcohol column. Focus on proportionate representation from the outset.
- Defining the Scale: Accurately mark the freezing and boiling points of water (0°C and 100°C for Celsius, 32°F and 212°F for Fahrenheit). These benchmarks provide immediate context.
- Graduation for Precision: Divide the main scale into smaller, consistent intervals. Ensure these minor graduations are evenly spaced and clearly discernible.
- Indicating the Reading: Draw the liquid column to a specific height, accurately representing a chosen temperature. This is where the diagram truly becomes informative.
The ‘Secrets’ of Superior Labeling:
Remember, a drawing without clear labels is merely a sketch. Our ‘labeling secrets’ are crucial here:
- Clarity is King: Use legible handwriting or fonts. Avoid cramped or overlapping text.
- Conciseness Counts: Get straight to the point. "Mercury Column" is better than "The liquid that rises and falls within the tube."
- Comprehensive Coverage: Label all essential parts: the bulb, the stem (glass tube), the liquid (mercury/alcohol), the scale (Celsius/Fahrenheit), the main graduations, and the specific temperature reading.
- Strategic Placement: Position labels horizontally, close to the element they describe, using neat leader lines if necessary. Avoid obscuring other parts of the diagram.
- Consistency Matters: Maintain a uniform style for all labels – font, size, and arrow style.
The Power of Practice: Honing Your Drawing Skills
Mastery in any skill, especially drawing precise scientific diagrams, comes through consistent effort. It’s not about being an ‘artist’; it’s about developing a keen eye for detail and steady hand.
- Repetition is Key: Just as a musician practices scales, consistently drawing thermometer diagrams helps embed the steps and principles into your muscle memory.
- Start Simple, Then Elaborate: Begin with basic outlines, then gradually add more detail, finer graduations, and complex labeling.
- Seek Feedback: Share your diagrams with peers or educators. A fresh pair of eyes can spot areas for improvement you might have overlooked.
- Utilize Resources: Refer back to examples, use rulers and protractors for accuracy, and don’t be afraid to trace initially to understand proportions.
Every diagram you draw, regardless of initial perceived ‘perfection,’ is a step towards greater understanding and skill. Embrace the process, and you’ll find your diagrams becoming increasingly polished and informative.
More Than Just Lines: Why Diagrams Matter
Well-executed diagrams are not just visual aids; they are powerful educational tools. For thermometer diagrams specifically, they:
- Demystify Abstract Concepts: Temperature, while an everyday phenomenon, is an abstract concept. A clear diagram provides a concrete visual representation of how it’s measured.
- Enhance Understanding of Principles: It helps students grasp the relationship between heat, the expansion of liquids, and the calibrated scale.
- Facilitate Learning and Teaching: Educators can use detailed diagrams to explain complex ideas efficiently, while students can use them to consolidate their learning and as a study reference.
- Build Scientific Literacy: The ability to accurately interpret and create scientific diagrams is a fundamental skill in all scientific disciplines, fostering critical thinking and attention to detail.
For both students tackling new concepts and educators explaining them, a precise thermometer diagram serves as a universal language, cutting through potential verbal ambiguities.
Your Confident Contribution: A Final Encouragement
To every student and educator reading this: know that you possess the ability to create exceptional scientific illustrations. Don’t be deterred by initial challenges; see them as opportunities for growth. Students, your detailed thermometer diagrams will not only earn you marks but, more importantly, deepen your scientific understanding. Educators, your commitment to teaching the nuances of diagramming empowers your students with invaluable communication tools. Approach each diagram with purpose, apply the ‘secrets’ of labeling, and watch as your confidence—and your diagrams’ clarity—soars.
Armed with these principles, you’re well-equipped to tackle any visual communication challenge ahead.
Frequently Asked Questions About Draw a Thermometer Like a Pro! Easy Steps & Labeling Secrets
What basic shapes are used when learning how to draw and label an thermometer?
The most common shapes used are a long rectangle for the thermometer’s body and a circle (or oval) at the bottom for the bulb. These simple shapes make it easy to learn how to draw and label an thermometer.
What are the key elements to include when you draw and label an thermometer?
Essential elements include the thermometer’s body, the bulb containing the liquid, and the temperature scale. Knowing how to draw and label an thermometer accurately is important for educational purposes.
What’s the best way to represent temperature on a thermometer drawing?
Use a colored column (typically red) to visually represent the temperature level. Clearly mark the scale with degree markings (Celsius or Fahrenheit) for better understanding when you draw and label an thermometer.
Are there different styles of thermometers I can draw and label?
Yes, you can draw and label different types like digital thermometers or classic mercury thermometers. Each style requires slight variations in the drawing, but the principles of how to draw and label an thermometer remain similar.
And there you have it – the complete blueprint for crafting a perfect thermometer diagram! We’ve journeyed through the ‘secrets,’ from constructing the foundational Bulb and Capillary Tube to decoding the intricacies of Celsius Scale and Fahrenheit Scale. You’ve learned the art of adding precise graduations, explored the nuances of different thermometer types like Mercury and Alcohol Thermometers, and mastered the critical skill of clear, comprehensive labeling.
Remember, the power of a well-executed diagram cannot be overstated in enhancing the understanding of temperature and broader scientific principles. We encourage both students and educators to consistently practice these step-by-step instructions. With each drawing, you’ll refine your skills, confidently creating detailed, informative, and truly effective thermometer illustrations that stand out for all educational purposes. Go forth and draw with precision!
