Draw a Basket Like a Pro: Simple Steps Revealed!
Interested in mastering the art of plain basket drawing? Understanding basic perspective principles is fundamental to realistically depicting three-dimensional objects like baskets. Art supply stores offer a wide range of drawing pencils essential for creating varied tones and textures. Even Leonardo da Vinci’s sketching techniques can inspire our approach to capturing the intricate details of a plain basket drawing. The steps explained will help you learn the art of plain basket drawing.
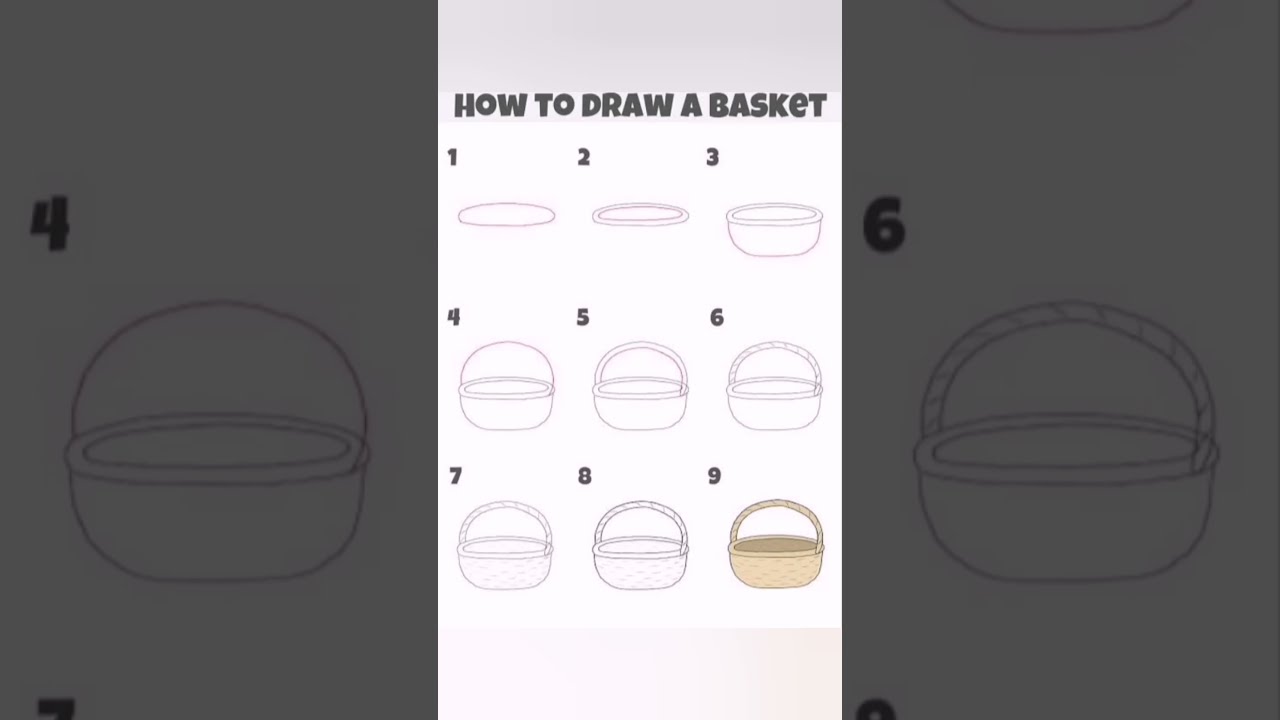
Image taken from the YouTube channel Art By Sidzz 👩🎨 , from the video titled How To Draw A Basket 🧺 with 6 Easy Steps#art#artist#artwork#easy#basket#drawing#drawingtutorial#vira .
Mastering the Plain Basket Drawing: A Step-by-Step Guide
Want to learn how to draw a beautiful plain basket drawing? It’s easier than you think! This guide will break down the process into simple, manageable steps, transforming you from a beginner to a basket-drawing pro in no time. We’ll focus on creating realistic-looking textures and shapes to bring your plain basket drawing to life.
1. Gathering Your Supplies: The Artist’s Toolkit
Before we begin, ensure you have the right tools at your disposal. This preparation will make the process smoother and more enjoyable.
- Pencil: A standard HB pencil is perfect for sketching and lighter shading. A softer pencil like a 2B or 4B will be helpful for darker areas and creating shadows.
- Eraser: A kneaded eraser is ideal for lifting graphite without damaging the paper, while a regular eraser will handle larger corrections.
- Paper: Choose a smooth or lightly textured paper suitable for pencil drawings. Sketchbook paper is a great option.
- Optional: A ruler can be helpful for creating straight lines, although we’ll be aiming for a more natural, hand-drawn look.
2. Establishing the Basic Shape: Laying the Foundation for your Basket
This step is crucial for defining the overall form of your plain basket drawing.
2.1. Drawing the Ellipse: Defining the Basket’s Opening
Start by lightly sketching an ellipse. This ellipse will represent the opening of your basket. Remember, ellipses are essentially squashed circles. Consider the angle you want to view the basket from; the more tilted the basket, the narrower the ellipse.
- Tip: Practice drawing ellipses on a separate piece of paper until you feel comfortable with the shape. Try drawing them in different orientations.
2.2. Determining the Basket’s Height: From Top to Bottom
Next, lightly draw two vertical lines extending down from the edges of the ellipse. These lines will determine the height of your plain basket drawing. Keep these lines parallel for a balanced look.
2.3. Connecting the Base: Completing the Form
Connect the bottom of the vertical lines with another ellipse. This ellipse will represent the base of the basket. This ellipse should be less curved than the top ellipse because we are seeing less of the underside of the basket.
3. Adding the Woven Texture: Bringing the Basket to Life
This is where the magic happens! We’ll simulate the woven texture of the basket to make it look realistic.
3.1. Drawing Horizontal Weaves: Simulating the Basket’s Structure
Lightly draw horizontal lines around the basket, following the contours of the shape you’ve created. These lines should be slightly curved to mimic the roundness of the basket. The lines should be closer together to create the illusion of woven strands.
3.2. Drawing Vertical Weaves: Intersecting the Horizontal Lines
Now, add vertical lines that intersect the horizontal lines. These lines don’t need to be perfectly straight; slight variations will make the weave look more natural.
- Tip: Pay attention to the areas where the vertical and horizontal lines overlap. Vary the darkness of these areas to create depth.
3.3. Creating Depth and Dimension: Adding Shading and Highlights
Adding shading will make your plain basket drawing appear more three-dimensional.
- Shadows: Add darker shading to the areas of the basket that are furthest from the light source. This typically includes the inside of the basket, the areas beneath the top rim, and the bottom of the basket.
- Highlights: Leave areas unshaded to represent where light is hitting the basket. These highlights will add contrast and make the basket look more realistic.
- Texture: Use small, directional strokes to emphasize the woven texture. Vary the pressure of your pencil to create different shades and tones.
4. Refining the Details: Polishing Your Plain Basket Drawing
This final step focuses on refining the details to make your plain basket drawing truly stand out.
4.1. Strengthening Lines and Adding Definition
Go over the lines that define the overall shape of the basket, adding more pressure to your pencil to make them bolder. This will help to define the form and make it more visually appealing.
4.2. Adjusting Shading and Highlights
Take a step back and assess the overall balance of shading and highlights. Adjust these areas as needed to create a more convincing sense of depth and dimension. Darken the shadows and brighten the highlights for maximum impact.
4.3. Erasing Unnecessary Lines
Carefully erase any unnecessary guidelines or construction lines that are still visible. This will clean up the drawing and make it look more polished.
4.4. Optional Details: Adding Personal Touches
Consider adding details like a handle, fruits inside the basket, or a cloth draped over the edge to personalize your plain basket drawing.
FAQs: Mastering Basket Drawing
Here are some frequently asked questions about drawing baskets, helping you achieve a professional look with simple techniques.
What’s the most important thing to consider when starting a basket drawing?
Focus on the overall shape first. Get the basic ellipse or rounded rectangle right before adding details. This foundational step is key for a realistic and balanced plain basket drawing.
How can I make my woven texture look more realistic?
Vary the thickness and spacing of your lines. Overlapping lines add depth. Remember, real weaving isn’t perfectly uniform, and mimicking that imperfection is key to a convincing plain basket drawing.
I’m struggling to make my basket look three-dimensional. Any tips?
Use shading strategically. Darken areas inside the basket and where strands overlap to create depth. Pay attention to the light source to establish realistic shadows for a captivating plain basket drawing.
What’s the best way to practice drawing different types of baskets?
Start with simple shapes like round or square baskets. Then, experiment with different weave patterns and embellishments. Reference photos of real baskets can be incredibly helpful for learning various styles in plain basket drawing.
Alright, you’ve got the fundamentals of plain basket drawing down! Now go grab your pencils and get creating. I can’t wait to see what you come up with!
